Sunday, December 8, 2013

Roasted Spiced Butternut Squash Salad with MacIntosh Apples


This delicious salad was the main dish of our Thanksgiving meal and thoroughly enjoyed!

Butternut squash, spiced with clove, cinnamon and allspice and roasted then tossed with a mix of kale and spinach, red onions, chopped apples both dry and fresh, a handful of pumpkin seeds and dried cranberries and then tossed in mild creamy dressing of apple juice, sage, garlic and onions with a slight sweetness of added dates.

This salad just screams fall harvest making use of seasonal vegetables and colors.

The recipe was adapted from the new book by Dr. Joel Fuhrman, Eat to Live Cookbook, and like all the recipes of his that I have tried, is certainly a winner in our home. I'm looking forward to cooking my way through this book.


The best thing about his recipes is that I don't have to worry about them being healthy and I mean truly healthy not just some fad based on someone's opinion. Dr. Fuhrman puts so much emphasis on nutritional research that I don't think anyone else can truly compete in this area. He has enlisted the help of some top chefs to utilize his knowledge and guidelines and put together some winning recipes. I know that the recipes are designed for total wellness and having had such good results with every recipe tried so far, I also know that I don't have to worry about them tasting good. Two big thumbs up from here.

So on to the recipe:


Roasted Spiced Butternut Squash Salad with MacIntosh Apples

Recipe adapted from Dr. Fuhrman's book Eat to Live- Cookbook

Serves 4


For the Dressing:

1 clove of garlic
1 tablspoon chopped shallots
2 tablespoons apple cider vinegar
1 tablespoon dijon mustard (optional)
1/4 cup unsweetened apple juice or water
2 tablespoons raw almond butter
1 Medjool date, pitted and stemmed
1/2 cup parsley
6 fresh sage leaves

Combine dressing ingredients in a high speed blender until well combined. Set aside.

For the Butternut Squash:

12 ounces butternut squash, peeled and cut into 3/4 inch diced pieces
1 tablespoon coconut or date sugar (optional)
pinch of cinnamon
pinch of ground cloves
pinch ground allspice
pinch of cayenne
1/2 cup of unsweetened apple juice

Preheat oven to 350 degrees F.
In a big bowl, toss the squash with the sugar, spices and apple juice until well coated. Place the mixture in a roasting pan, cover with foil and roast until the squash is caramelized and slightly browned but still firm when tested with a fork. About 15 mins total but stir/toss about half way through.

Note: If you are fortunate to find fresh diced squash in your grocery store, usually in 32 ounce portions, go ahead and double this portion of the recipe. I guarantee the extra roasted squash will not go to waste. It's so good!

For the Salad:

4 tablespoons pumpkin seeds
4 tablespoons dried cranberries
2 apples of choice, (Winesap is what was called for in the original recipe but I used MacIntosh)
2 tablespoons chopped dried apples
1/2 of a red onion, sliced into fine rings
3 cups spinach, sliced
3 cups kale, sliced

While the squash is roasting, combine the salad ingredients in a big bowl.

When the squash is ready, toss it with the salad dressing until well coated and then add to the salad, toss and serve right away. 

I hope you enjoy this as much as we did. You can substitute sweet potatoes, parsnips or any other type of squash you desire as well. It's all good.


And if you are looking for a nice dessert for this meal, check out the previous recipe for the Cranberry Apple Tart!

Enjoy!


Find us on Facebook here, Follow on Pinterest here, and See what we're up to on Instagram here.


Monday, December 2, 2013

Cranberry Apple Tart

Well, I have to say the time has just flown since my last post and I must apologize. The good news is that this is the year my health has improved to the point where I could return to my passion, which is interior design and that has kept me very busy with deadlines these last few months. I have to say I think a great deal of credit has gone to my mostly improved eating habits. I can't say I'm above backsliding into some old habits now and then but for the most part, I eat quite a bit differently than I used to.

When it came time for Thanksgiving this year, we thought to our favorite recent Thanksgiving meals and decided that a plant based dinner, mostly raw is what suits us best. Because raw and plant based foods are so filling and there is only the two of us, we spread out the celebration over the weekend instead of all at once in one meal and that was very rewarding.

I'm starting here with sharing the dessert first because... well, you have to have priorities. ;-)

 Cranberry Apple Tart with a Caramel Drizzle

Very simple and also very delicious. Fresh apples, cranberries, a pear, dates, raisins, nuts and sweetener of choice and you've got a wonderful impressive tart in the bag. No one even has to know it's raw but your friends and family that want to avoid gluten, and dairy will surely appreciate it. The cranberries add a little tartness and quite frankly, the filling could be used as a cranberry apple relish/ sauce as well.


Crust:
2 cups almonds
1 cup dates, pitted and stemmed- soft
1/4 teaspoon salt

Place all the above in a food processor and process until crumbly and the mixture sticks together when pressed between your fingers. Be careful not to over process though to the point of creating a nut butter. Press into the bottom and up the sides of a tart pan or pie pan. Freeze until ready to assemble.

Tip: If you have leftover crust add a little dried coconut and some chopped walnuts and set aside for topping your favorite banana ice cream, cereal or fruit bowl. So delicious!


Filling:
1 ripe pear, peeled, cored, and chopped
3 apples, peeled and cored, reserve 1/2 an apple for topping
1 cup fresh cranberries
1 lemon, juiced
1/2 cup of dates, pitted, stemmed and soft (soak in water if necessary to soften)
1/2 cup of raisins, soft (soak in water for about 30 minutes until plump and drain)
1/4 cup coconut or agave nectar
pinch of cinnamon

Place all but 1/2 an apple and half the lemon juice in a food processor. Blend until well mixed but chunky. You can do a couple of things at this point: Rough chop the rest of the apple and stir into the mix or do like I did and slice thinly the 1/2 apple and toss with the remaining lemon juice and decorate the top of the tart right before serving.

Remove tart crust from freezer and remove the tart from the pan. It should be well set. Spoon mixture into the tart, and either decorate top and serve or return to the freezer until serving.

Caramel Sauce:
1 cup of dates, seeded and stemmed, soft
2 tablespoons coconut butter
3 tablespoons coconut or agave nectar
1/4 teaspoon sea salt
1 teaspoon vanilla
2 tablespoons filtered water

Blend until well combined and to desired consistency. I actually start this in the food processor and then finish in the Vitamix to get it really smooth.

Poor into a nozzle tipped container or use a plastic bag with the corner snipped off to get control over the drizzle. 


Serve up your tart with a drizzle over top and don't forget to add a little on each slice.


Tip: 
This cuts much easier when frozen so I recommend cutting into slices and then defrosting to serve. The tart will keep about 3 days covered well in the fridge or for longer keeping, freeze.

I hope you give this one a try. It's a nice twist on the old standard apple.

Keep an eye out for the rest of our holiday dishes from the weekend. They are great for this fall time of year.

Happy Holidays!!


Find us on Facebook here, Follow on Pinterest here, and See what we're up to on Instagram here.

Tuesday, July 23, 2013

Middle Eastern Salad- Eating on the Road


We were watching of all things a show about fast food in foreign countries a while back. (Yea… I know) and were surprised to hear that in the Middle East this was something that big chains like McDonald's and even Subway, needed to add to their menus to catch on locally. (Sad that they are there at all but that's another topic.) This salad is a staple in some countries and especially for breakfast, an idea I rather liked. It caught my interest and I did some researching, even before the show was over.

It goes by different names: Israeli Salad, Arabic Salad, Palestinian Salad and probably others I am not aware of but rather than get into this hot bed of debate I decided to call it just Middle Eastern Salad.

It has some very simple fresh ingredients like tomatoes, cucumber, lemon juice, and herbs like parsley and mint and of course there are many variations as well. I decide to whip this up to take on our trip and it filled in quite well for many snacks and meals.


Although you can eat this as is as a salad, I also made up a no bean Raw Red Pepper Hummus (I have posted something similar here) to have on hand and the two worked out nicely to fill pita bread for a heartier meal as well as to use for chips and veggies. For all raw, you can use endive lettuce as scoops, something we often do.


We cleared out our mini bar fridge and stocked it with things like fresh fruit, smoothies, the hummus and salad, along with veggies and of course water. This really helped us to keep a lid on eating out too much while away from home. The hummus lasted about 5 days and the salad about 3-4. The chips, not that long at all.

In Room Dining- (sorry the lighting wasn't the best.)

Middle Eastern Salad

3 large cucumbers peeled and seeded and then diced
4 medium tomatoes, seed and diced
1/2 cup chopped parsley
1/2 cup chopped fresh mint
1 small red onion, diced or about 5 green onions chopped
1 medium lemon zested and juiced
salt and pepper to taste 

(I omitted the salt so just know that you might want to add this when serving and not before. It will make the cucumbers sweat and it will become watery as it sits.)

Mix all the above in a bowl and let sit at least 15 minutes or store in a sealed container and chill. 
It makes about 2 quarts and will keep for 3-4 days in the refrigerator.


As a side note, I have discovered a great substitute for store bought chips- Pita bread. 
Most often you can find pita bread that is free from preservatives and sometimes salt and oil as well. Gluten free would be a bonus but I have yet to discover that. I find that I don't react too much to pita.


I just cut them up into triangles and pop into the oven at about 325 degrees for 7-8 minutes until desired crispness. The hummus I made had quite a bit of garlic so I left these plain but for garlic flavored you can spritz with water and dust lightly with garlic powder. As an alternative you can spray with olive oil and do the same but I'm watching the use of oil and don't miss it at all.

On a Personal Note:


We had a great trip and although we tried to stay with our eating routine, we did stray while eating in restaurants and with friends and family. We both have decided that a cleanse or detox is definitely in order to feel our best again. 

So we are back to high raw food, salads, juices and smoothies for a while.

I can't wait to get back in the kitchen.

Until next time….


Friday, July 12, 2013

Raw on the Run- Lara Bites


I have to apologize. We are away from home at the moment and due to an overcrowded hotel internet service, I have not been able to post as I had planned. I have been trying at different times during our stay to edit photos or even upload them from my camera but my connection keeps getting lost. In a last ditch effort, finally I was able to connect tonight and nearly 12 am! I guess everyone is going to sleep as I should be. I was afraid it could have been my computer so it is a relief but since this is a working trip, this is not very feasible for posting, so this may be my only post until I return home. So sorry.

Before leaving home, I made an effort to stock us with some food for the trip. We were able to keep most of it in the hotel mini bar fridge and it has saved us from dining at unpredictable restaurants for the most part of our meals.

One of our favorites is this recipe, which I have to confess was one of my very first attempts at making raw food several years ago. It's a staple in the raw food community, known widely as Ani Phyo's Donut Holes. Since it really does not compare to sugary donut holes other than by looks, I prefer to call them "energy bites" as that seems more fitting.

Dates, dried pineapple, coconut, and almonds are about what you will find in a Lara bar, and since a bite size is enough to satisfy, "Lara Bites" it is!

This is very simple to make and with few ingredients, it makes a nice alternative to buying Lara bars.


Lara Bites aka Ani's Donut Holes

Donut Ingredients
  • 1 ¾ cups almonds
  • ½ teaspoon sea salt
  • 1 vanilla bean, scraped
  • 2 cups dried pineapple, chopped
  • 2 cups pitted dates
  • 1/3 cup plus 1/4 cup shredded coconut
Donut Directions
  1. In food processor, place almonds, salt, and vanilla.
  2. Process into a fine powder first.
  3. Slowly add chopped pineapple and dates, mix well.
  4. Place in a large bowl. Mix in 1/3 cup shredded coconut.
Finale
  • To serve, use an ice cream scooper or spoon to form donut holes.
  • Roll holes in ¼ cup shredded coconut. 
  • Will keep for over a week in the fridge.
From the book Ani’s Raw Food Kitchen by Ani Phyo
Rather than me showing photos of how to make these, (which I can't seem to upload anyway) I decided who better to show the process than Ani herself. So here is a video of Ani the amazing, making her delicious raw donut holes.


These little balls will keep nicely in your refrigerator for about a week. If you don't think you'll eat them that fast, I would suggest freezing them, which is what I do and they will keep for considerably longer.


I hope you consider trying these.  I will resume my blog posting when I return. I do have some lovely dishes that I created for the trip as well, mostly raw as that just worked the best for traveling. Hope you are all enjoying your summer.

Until next time, and when I return to better internet service...
Take care.


Wednesday, July 3, 2013

Frosted Raspberry Black Bean Brownies


No doubt this title sounds a little strange. I know it did to me when I first read about these. Black beans and brownies are never three words I would have put together without wincing. Probably what you are doing now.

But surprise! It works!

Over on Dr. Fuhrman's member site this is one recipe that everyone seems to love so I thought, hey! I love brownies so I'm game.

But why would anyone make brownies with black beans at all?

I hear ya. Well the benefits are many:

no processed sugar
no flour (aka gluten)
no dairy
no soy
vegan
no heavy amount of nuts like most raw desserts (although there is some nut butter)
plus lots of beneficial carbs and fiber from the black beans
chia!

Beans of all kinds are a dieters best friend as they fill you up, have great fiber and are a good source of calories when eating a high produce (and low calorie) diet.


I added raspberries because really what goes better with chocolate than raspberries?

I also decided to use a 12 individual cheesecake pan when I read that the serving size was 12. I cut the time down for mine because of the pan and frankly I could have cooked mine longer. They were not as fully cooked as they could have been. They came out more like a pudding cake, which was still quite good but for a crunchier outside, more time would have been better.

The frosting is optional and also vegan, sugar and nut free. Have you had "Chocomole" aka chocolate frosting made with avocados before? It's very good and even great as a pudding.

So let's get to it, shall we?


Raspberry Black Bean Brownies

Recipe adapted from Dr. Fuhrman's Black Bean Brownies from the website: DrFuhrman.com


Ingredients for Brownies:

2 cups of no or low salt black beans, drained and rinsed or home cooked
10 pitted medjool dates, soaked until soft
2 tablespoons raw almond butter
1 teaspoon vanilla
1/2 cup unsweetened cocoa powder or cacao
1 tablespoon ground chia seeds
1 pint of raspberries, divided.

Instructions:

Preheat oven to 200 degrees F.

Combine black beans, dates, almond butter and vanilla in a food processor or high-speed blender. I used my Vitamix for this and while you can, you will get quite a workout with the plunger as this batter is really really quite thick. I had to add a couple of tablespoons of water to get it moving at all. Next time I will use a food processor.

Once well mixed, go ahead and add the cocoa powder and the ground chia seeds and blend again.

(Sorry, about the lighting here. I lost my sunlight unexpectedly- darn clouds!) 
Spread half the mixture into a lightly oiled pan (8x8) or muffin/ cheesecake pan. Mine was non-stick so I did not use any oil.

Mash up 3/4 cup of the raspberries in a cup and then spread over half the brownie batter. Then add the remaining batter over the raspberry layer to the.

Bake for 1 1/2 hours at 200 degrees.
Cool completely. Apply topping if desired. Cut into 12 pieces or remove from cups.
Can be stored in the refrigerator covered for up to a week. (I froze mine.)

Chocomole aka Chocolate Frosting (optional)


Ingredients:

1 ripe avocado
1/2 cup water
4 tablespoons unsweetened cocoa powder or cacao
5 pitted medjool dates, soaked until soft.
splash of vanilla

Blend all ingredients until smooth.


Frost brownies if using and top with remaining raspberries.


 Eat!


Well are you game? I hope you give these a try. And if you do, please come back and tell me your verdict.

I'll be sharing this over at Healthy Vegan Fridays and also on Gluten Free Wednesdays over at the Gluten Free Homemaker's site.


Oh and one more thing:

When you have that blender all chocolateied (is that a word?) up after making the frosting use that left over goodness to whip up a smoothie.

Chocolate Raspberry Banana Smoothie:


Blender coated with chocomole
1 cup of almond milk
handful of raspberries
2 dates
2 frozen bananas

YUM!!

Until next time…


Find us on Facebook here, Follow on Pinterest here, and See what we're up to on Instagram here.

Monday, July 1, 2013

No Fuss-Thai Crunch Salad w/ a Spicy Asian Peanut Dressing


Need an easy salad to throw together with almost no prep? 
Something that can feed a crowd for a potluck or BBQ and be enjoyed by all? 
An easy meal to keep in the fridge ready for tossing with dressing for work or quick meals?

Well then this is your salad.

I call it my cheater salad because it's almost too easy. Aside from chopping green onions, which is completely optional, all you really need to make this salad is a big bowl and pair of scissors… for opening the bags. It's a staple in our rotation and delicious!

It utilizes pre prepped salad bags from your grocer and while I use a ready made dressing from Trader Joe's, I have also included an easy to make raw version as well for those not fortunate to have a TJ's nearby.

Thai Crunch Salad


Ingredients:

A bag of butter lettuce, with radichio if possible
A bag of shredded green cabbage
A bag of broccoli slaw
A bag of shredded carrots
Shelled and cooked edamame
1/2 cup cashews, preferably unsalted and raw
1-2 green onions, white and greens chopped, optional if choosing no prep version
12 ounces of Asian Spicy Peanut Dressing (optional home made version below)

Instructions:

Empty contents of bags into a BIG bowl and toss with clean hands.


Add in the topping bits and toss gently again or leave on the side for self serving.


If serving right away, go ahead and add dressing and toss. If serving a crowd all at once you may need two bottles of dressing, depending on taste preference.

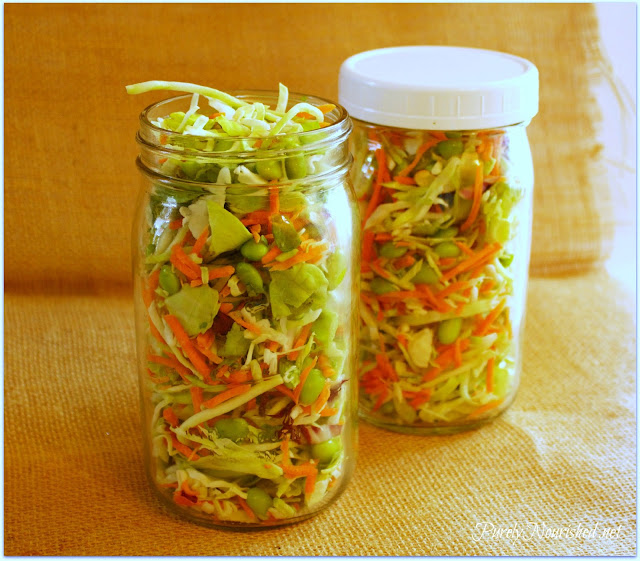
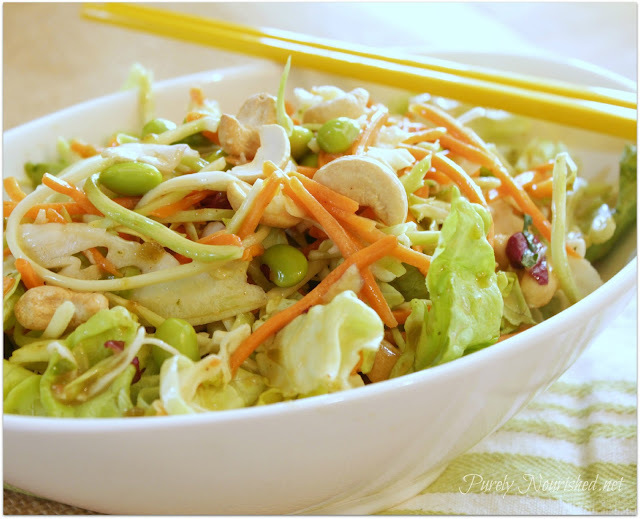
Note: This is about 1/4 of the salad here in this picture.

If storing for later meals you can easy put the un-tossed salad either in bags or jars to add dressing later.


This will make approximately 6 quarts of salad as written here. Add more lettuce to the base if you want to stretch it further.

Mock Peanut Dressing


1/2 cup raw Almond Butter
1/4 cup Water
1 Tbsp fresh Lemon juice
2 tsp Agave or Coconut Nectar or Maple Syrup
2 tsp Tamari
1/2 tsp crushed Garlic (1 clove)
1/4 tsp grated fresh Ginger
dash Cayenne Pepper
dash Sea Salt

Place all ingredients in a blender and process until smooth. Store in sealed container in the fridge. Should keep 5 days. Makes 1 cup

Raw Food Made Easy For 1 or 2 PeopleDressing Recipe found in Jennifer Cornbleet's Raw Food Made Easy for 1 or 2 people, which by the way is a really great book!

I haven't ever made something from this book that we did not like.


So there you have it: My Cheater Thai Crunch Salad. I hope you give it a try and come back and let me know how you liked it here in the comments.

I'll be sharing this over at Gluten-Free Cats' Raw Thursday as well as Healthy Vegan Fridays.


NOTE: I have added Recipage to this blog so all recipes can be found indexed and ready for easy printing at the Recipe tab at the top of the page. Enjoy!


Find us on Facebook here, Follow on Pinterest here, and See what we're up to on Instagram here.


Tuesday, June 25, 2013

Corn, Tomato and Green Bean Salad


This time of year, my thoughts are taken over by the fresh flavors of summer. Two of my favorites are tomatoes and corn and with the Fourth of July right around the corner and summer BBQs and get togethers in the plans, this is the perfect salad for company or anytime you want something simple and delicious.

One of my all time favorite and simple salads is this one, a Simple Fresh Corn and Tomato Salad, where the two flavors are mixed with fresh basil and shared on my old blog GettingRAW.com.


Here I've decided to update it with the addition of blanched fresh green beans and sliced red onions and with the omission of salt and oil. I think it just keeps getting better, if that's even possible.

I used fresh sweet corn here and I even cooked it but that's not even necessary. Fresh raw corn is delicious and while uncooked it remains a vegetable and not a starch in our digestive systems.

I also used two different corn strippers and have provided my reviews of how they worked for those considering such a tool. Just be really careful because I can't tell you how many friends have reported slicing their fingers with these super sharp tools. But if you want to make it even easier, you can use frozen corn.

Corn, Tomato and Green Bean Salad


Ingredients


4 ears of fresh sweet corn, shucked and silk removed, approximately 3 cups
1 lb fresh green beans, stem ends snapped off
1/2 small red onion, sliced in very thin rings and then cut in half
1 pint cherry tomatoes, sliced in half or even quarters if big
1 cup fresh basil leaves, roughly chopped
1/4 cup balsamic vinegar

Directions:


Put a large pot of water on to boil. Cook the corn, if desired, about 5- 7 minutes or until tender. Remove corn from water and set aside to cool for cutting.


Place green beans in the pot and cook until tender, approximately 8 minutes. While green beans are cooking prepare a bowl of water with ice. Once green beans are done, submerge in the ice water bath to stop the cooking.

Remove corn kernels from the cob (options shown below) and place in a large bowl. Add the green beans and put the sliced onions in the ice bath while preparing the rest. This crisps up the onions while also mellowing the flavor.


When ready to serve, add all the ingredients to the bowl and toss with the balsamic vinegar.


This salad is really a winner! Enjoy!

Corn Stripper Review

I have two different strippers that I have bought over time. 


The first is the Good Cook Professionals Stripper.

This slides down over the cob and removes the corn from both sides at once. The downside is that it doesn't really adjust to get wider as you go down the cob and it works even worse with the cob inverted so it tends to cut the kernels in half and not get them all removed.


     The second one is the Kuhn Rikon Corn Stripper.

It's a little more expensive but is very easy to use. This one is razor sharp and comes with a blade cover for obvious reasons. This one cuts close to the cob and just zips the corn right off the cob. The corn comes off in sheets and is less ripped up. You get more of the whole kernels this way. This is the one that can really cut your fingers so be very careful!


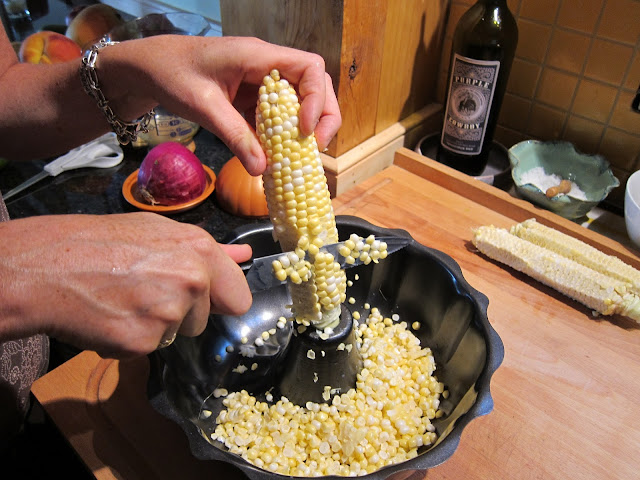
I also stumbled across this great photo (sorry not sure of source) showing an easy way to both remove and catch the kernels. Had I had a Bundt cake pan handy, I certainly would have given this a try. 
This shows another simple utensil for removing corn from the cob- a sharp knife.


So I hope that was helpful. Any other good ideas out there for removing corn from the cob? I'd love to hear.

I'll be sharing this over at Gluten-Free Cats' Raw Thursday as well as Healthy Vegan Fridays and was even featured at 5 Ingredient Mondays over at Sift Stir and Savor.

Meanwhile, I hope this finds you enjoying the summer harvest of amazing produce. 

Until next time…. take care.


Find us on Facebook here, Follow on Pinterest here, and See what we're up to on Instagram here.