Showing posts with label tomatoes. Show all posts

Tuesday, July 23, 2013

Middle Eastern Salad- Eating on the Road


We were watching of all things a show about fast food in foreign countries a while back. (Yea… I know) and were surprised to hear that in the Middle East this was something that big chains like McDonald's and even Subway, needed to add to their menus to catch on locally. (Sad that they are there at all but that's another topic.) This salad is a staple in some countries and especially for breakfast, an idea I rather liked. It caught my interest and I did some researching, even before the show was over.

It goes by different names: Israeli Salad, Arabic Salad, Palestinian Salad and probably others I am not aware of but rather than get into this hot bed of debate I decided to call it just Middle Eastern Salad.

It has some very simple fresh ingredients like tomatoes, cucumber, lemon juice, and herbs like parsley and mint and of course there are many variations as well. I decide to whip this up to take on our trip and it filled in quite well for many snacks and meals.


Although you can eat this as is as a salad, I also made up a no bean Raw Red Pepper Hummus (I have posted something similar here) to have on hand and the two worked out nicely to fill pita bread for a heartier meal as well as to use for chips and veggies. For all raw, you can use endive lettuce as scoops, something we often do.


We cleared out our mini bar fridge and stocked it with things like fresh fruit, smoothies, the hummus and salad, along with veggies and of course water. This really helped us to keep a lid on eating out too much while away from home. The hummus lasted about 5 days and the salad about 3-4. The chips, not that long at all.

In Room Dining- (sorry the lighting wasn't the best.)

Middle Eastern Salad

3 large cucumbers peeled and seeded and then diced
4 medium tomatoes, seed and diced
1/2 cup chopped parsley
1/2 cup chopped fresh mint
1 small red onion, diced or about 5 green onions chopped
1 medium lemon zested and juiced
salt and pepper to taste 

(I omitted the salt so just know that you might want to add this when serving and not before. It will make the cucumbers sweat and it will become watery as it sits.)

Mix all the above in a bowl and let sit at least 15 minutes or store in a sealed container and chill. 
It makes about 2 quarts and will keep for 3-4 days in the refrigerator.


As a side note, I have discovered a great substitute for store bought chips- Pita bread. 
Most often you can find pita bread that is free from preservatives and sometimes salt and oil as well. Gluten free would be a bonus but I have yet to discover that. I find that I don't react too much to pita.


I just cut them up into triangles and pop into the oven at about 325 degrees for 7-8 minutes until desired crispness. The hummus I made had quite a bit of garlic so I left these plain but for garlic flavored you can spritz with water and dust lightly with garlic powder. As an alternative you can spray with olive oil and do the same but I'm watching the use of oil and don't miss it at all.

On a Personal Note:


We had a great trip and although we tried to stay with our eating routine, we did stray while eating in restaurants and with friends and family. We both have decided that a cleanse or detox is definitely in order to feel our best again. 

So we are back to high raw food, salads, juices and smoothies for a while.

I can't wait to get back in the kitchen.

Until next time….


Tuesday, June 25, 2013

Corn, Tomato and Green Bean Salad


This time of year, my thoughts are taken over by the fresh flavors of summer. Two of my favorites are tomatoes and corn and with the Fourth of July right around the corner and summer BBQs and get togethers in the plans, this is the perfect salad for company or anytime you want something simple and delicious.

One of my all time favorite and simple salads is this one, a Simple Fresh Corn and Tomato Salad, where the two flavors are mixed with fresh basil and shared on my old blog GettingRAW.com.


Here I've decided to update it with the addition of blanched fresh green beans and sliced red onions and with the omission of salt and oil. I think it just keeps getting better, if that's even possible.

I used fresh sweet corn here and I even cooked it but that's not even necessary. Fresh raw corn is delicious and while uncooked it remains a vegetable and not a starch in our digestive systems.

I also used two different corn strippers and have provided my reviews of how they worked for those considering such a tool. Just be really careful because I can't tell you how many friends have reported slicing their fingers with these super sharp tools. But if you want to make it even easier, you can use frozen corn.

Corn, Tomato and Green Bean Salad


Ingredients


4 ears of fresh sweet corn, shucked and silk removed, approximately 3 cups
1 lb fresh green beans, stem ends snapped off
1/2 small red onion, sliced in very thin rings and then cut in half
1 pint cherry tomatoes, sliced in half or even quarters if big
1 cup fresh basil leaves, roughly chopped
1/4 cup balsamic vinegar

Directions:


Put a large pot of water on to boil. Cook the corn, if desired, about 5- 7 minutes or until tender. Remove corn from water and set aside to cool for cutting.


Place green beans in the pot and cook until tender, approximately 8 minutes. While green beans are cooking prepare a bowl of water with ice. Once green beans are done, submerge in the ice water bath to stop the cooking.

Remove corn kernels from the cob (options shown below) and place in a large bowl. Add the green beans and put the sliced onions in the ice bath while preparing the rest. This crisps up the onions while also mellowing the flavor.


When ready to serve, add all the ingredients to the bowl and toss with the balsamic vinegar.


This salad is really a winner! Enjoy!


Corn Stripper Review

I have two different strippers that I have bought over time. 


The first is the Good Cook Professionals Stripper.

This slides down over the cob and removes the corn from both sides at once. The downside is that it doesn't really adjust to get wider as you go down the cob and it works even worse with the cob inverted so it tends to cut the kernels in half and not get them all removed.


     The second one is the Kuhn Rikon Corn Stripper.

It's a little more expensive but is very easy to use. This one is razor sharp and comes with a blade cover for obvious reasons. This one cuts close to the cob and just zips the corn right off the cob. The corn comes off in sheets and is less ripped up. You get more of the whole kernels this way. This is the one that can really cut your fingers so be very careful!


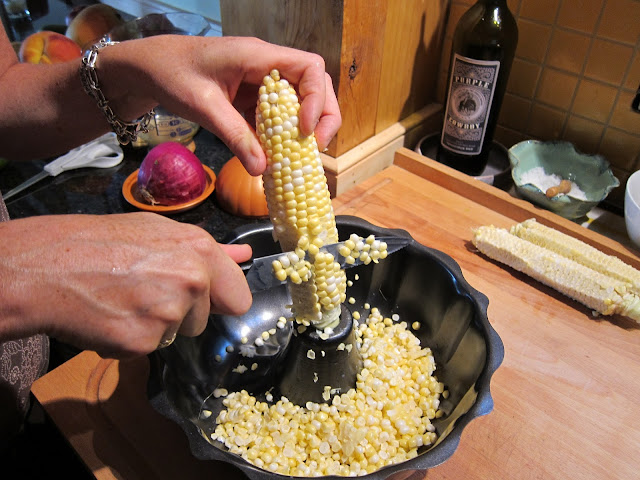
I also stumbled across this great photo (sorry not sure of source) showing an easy way to both remove and catch the kernels. Had I had a Bundt cake pan handy, I certainly would have given this a try. 
This shows another simple utensil for removing corn from the cob- a sharp knife.


So I hope that was helpful. Any other good ideas out there for removing corn from the cob? I'd love to hear.

I'll be sharing this over at Gluten-Free Cats' Raw Thursday as well as Healthy Vegan Fridays and was even featured at 5 Ingredient Mondays over at Sift Stir and Savor.

Meanwhile, I hope this finds you enjoying the summer harvest of amazing produce. 

Until next time…. take care.


Find us on Facebook here, Follow on Pinterest here, and See what we're up to on Instagram here.

Sunday, May 19, 2013

Summer Vegetable Soup


Welcome to another Super Soup Sunday. 


Sunday, the day where we get a jump on the week by making a luscious soup that will get us through a few meals in the upcoming week. I am really liking this new routine. Even though it sometimes takes some time to prepare, it feels like I am taking the pressure off myself for the next few meals to come and that brings a welcome sense of relief.

Last week's Quick and Easy Black Bean Soup required very little effort and was made from ingredients that could be kept on hand in the pantry and the freezer for a meal and soup in a pinch.  This week, I am doing the opposite.


This Summer Vegetable Soup is made from almost entirely fresh in-season Summer ingredients. It didn't dawn on me until I took the ingredient line up photo that I missed an opportunity here to make it all fresh. I had chosen to use some frozen roasted corn. Darn! While the roasted corn added a different flavor, and saved me some work, fresh corn would have been lovely.

Also this soup uses very little seasoning other than fresh garlic, fresh basil, onion and lemon, pepper and if you choose, salt. It's truly a soup that benefits from farm fresh seasonal ingredients. It just tastes like summer.

We are fortunate that we still have some of the last fresh lemons on the trees as well. One of the benefits of living in the California desert. That and the fact we have summer vegetables already.

Summer Vegetable Soup

Recipe adapted from the cookbook, Forks Over Knives, The Cookbook
It serves approximately 6.


Ingredients:

6 medium tomatoes, chopped
3 ears of corn, kernels removed from cob (about 2 cups)
2 medium zucchini, diced
1 medium yellow squash, diced
1 large onion, diced
6 cups low sodium vegetable broth or fresh no salt stock
4 cloves garlic, minced
1/2 cup finely chopped fresh basil
zest and juice of one lemon
pepper to taste (salt to if you must)

Directions:

Sautee the onions in a couple of tablespoons of the broth over medium heat for about 7-8 minutes.
Don't let them dry out, add more broth as necessary. Add the garlic and sautee another minute.


Add tomatoes and cook for about 10 minutes, just until tomatoes break down a little.


Add the zucchini, yellow squash, corn and vegetable broth.


Bring the pot to a boil on high, then reduce to medium and cook 15 minutes or until vegetables are tender.


Add the freshly chopped basil, lemon juice and zest and pepper and salt to taste.


And Enjoy!


Fresh Summer Vegetable Soup
This is another entry for Healthy Vegan Fridays.


Cooking Tip:

About this time, you might notice that you have left over broth. This seems to happen a lot as often 6 cups of broth is required for soup bases and a carton has 4 cups. I make broth cubes with the left overs and keep them in a bag in the freezer to use for sautéing vegetables. Also they come in handy to flavor the dog's dry food. What can I say, my dog is very spoiled. :-)

Left Over Broth Cubes


Personal Note:


I saw this quote over on FB this week, and it's stuck in my mind. It applies to me and this blog. I am definitely starting before I am ready and quite honestly if I waited until I was ready, I probably would never start. This is all a learning curve for me and quite frankly that's the point. 

So please bear with me as I improve my skills as I go along. This refers to camera operation, lighting, writing, cooking, media, graphic design, the list goes on and on. I am by no means a professional blogger, chef, or whatever and nor do I profess to be.
I am someone who is trying to heal myself with nutrition, learning new habits and tastes that I hope will last a lifetime and by sharing this adventure, I hope I can also inspire others in the process.

It's just me doing my thang.

So until next time… just be. (deep breath) ;-)


Like what you see? Why not share it? 

Also be sure to subscribe at the top of the page to receive notices of new posts. You can like us over on Facebook, follow us on Instagram or even Pinterest. It's all good!