Showing posts with label raw. Show all posts

Monday, December 2, 2013

Cranberry Apple Tart

Well, I have to say the time has just flown since my last post and I must apologize. The good news is that this is the year my health has improved to the point where I could return to my passion, which is interior design and that has kept me very busy with deadlines these last few months. I have to say I think a great deal of credit has gone to my mostly improved eating habits. I can't say I'm above backsliding into some old habits now and then but for the most part, I eat quite a bit differently than I used to.

When it came time for Thanksgiving this year, we thought to our favorite recent Thanksgiving meals and decided that a plant based dinner, mostly raw is what suits us best. Because raw and plant based foods are so filling and there is only the two of us, we spread out the celebration over the weekend instead of all at once in one meal and that was very rewarding.

I'm starting here with sharing the dessert first because... well, you have to have priorities. ;-)

 Cranberry Apple Tart with a Caramel Drizzle

Very simple and also very delicious. Fresh apples, cranberries, a pear, dates, raisins, nuts and sweetener of choice and you've got a wonderful impressive tart in the bag. No one even has to know it's raw but your friends and family that want to avoid gluten, and dairy will surely appreciate it. The cranberries add a little tartness and quite frankly, the filling could be used as a cranberry apple relish/ sauce as well.


Crust:
2 cups almonds
1 cup dates, pitted and stemmed- soft
1/4 teaspoon salt

Place all the above in a food processor and process until crumbly and the mixture sticks together when pressed between your fingers. Be careful not to over process though to the point of creating a nut butter. Press into the bottom and up the sides of a tart pan or pie pan. Freeze until ready to assemble.

Tip: If you have leftover crust add a little dried coconut and some chopped walnuts and set aside for topping your favorite banana ice cream, cereal or fruit bowl. So delicious!


Filling:
1 ripe pear, peeled, cored, and chopped
3 apples, peeled and cored, reserve 1/2 an apple for topping
1 cup fresh cranberries
1 lemon, juiced
1/2 cup of dates, pitted, stemmed and soft (soak in water if necessary to soften)
1/2 cup of raisins, soft (soak in water for about 30 minutes until plump and drain)
1/4 cup coconut or agave nectar
pinch of cinnamon

Place all but 1/2 an apple and half the lemon juice in a food processor. Blend until well mixed but chunky. You can do a couple of things at this point: Rough chop the rest of the apple and stir into the mix or do like I did and slice thinly the 1/2 apple and toss with the remaining lemon juice and decorate the top of the tart right before serving.

Remove tart crust from freezer and remove the tart from the pan. It should be well set. Spoon mixture into the tart, and either decorate top and serve or return to the freezer until serving.

Caramel Sauce:
1 cup of dates, seeded and stemmed, soft
2 tablespoons coconut butter
3 tablespoons coconut or agave nectar
1/4 teaspoon sea salt
1 teaspoon vanilla
2 tablespoons filtered water

Blend until well combined and to desired consistency. I actually start this in the food processor and then finish in the Vitamix to get it really smooth.

Poor into a nozzle tipped container or use a plastic bag with the corner snipped off to get control over the drizzle. 


Serve up your tart with a drizzle over top and don't forget to add a little on each slice.


Tip: 
This cuts much easier when frozen so I recommend cutting into slices and then defrosting to serve. The tart will keep about 3 days covered well in the fridge or for longer keeping, freeze.

I hope you give this one a try. It's a nice twist on the old standard apple.

Keep an eye out for the rest of our holiday dishes from the weekend. They are great for this fall time of year.

Happy Holidays!!


Find us on Facebook here, Follow on Pinterest here, and See what we're up to on Instagram here.

Monday, July 1, 2013

No Fuss-Thai Crunch Salad w/ a Spicy Asian Peanut Dressing


Need an easy salad to throw together with almost no prep? 
Something that can feed a crowd for a potluck or BBQ and be enjoyed by all? 
An easy meal to keep in the fridge ready for tossing with dressing for work or quick meals?

Well then this is your salad.

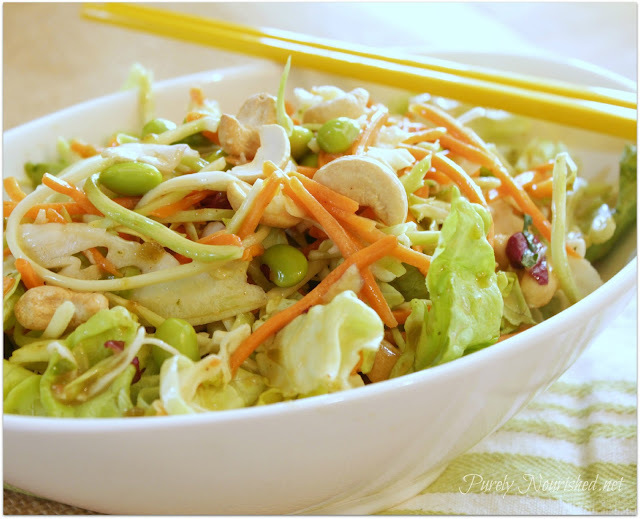
I call it my cheater salad because it's almost too easy. Aside from chopping green onions, which is completely optional, all you really need to make this salad is a big bowl and pair of scissors… for opening the bags. It's a staple in our rotation and delicious!

It utilizes pre prepped salad bags from your grocer and while I use a ready made dressing from Trader Joe's, I have also included an easy to make raw version as well for those not fortunate to have a TJ's nearby.

Thai Crunch Salad


Ingredients:

A bag of butter lettuce, with radichio if possible
A bag of shredded green cabbage
A bag of broccoli slaw
A bag of shredded carrots
Shelled and cooked edamame
1/2 cup cashews, preferably unsalted and raw
1-2 green onions, white and greens chopped, optional if choosing no prep version
12 ounces of Asian Spicy Peanut Dressing (optional home made version below)

Instructions:

Empty contents of bags into a BIG bowl and toss with clean hands.


Add in the topping bits and toss gently again or leave on the side for self serving.


If serving right away, go ahead and add dressing and toss. If serving a crowd all at once you may need two bottles of dressing, depending on taste preference.

Note: This is about 1/4 of the salad here in this picture.

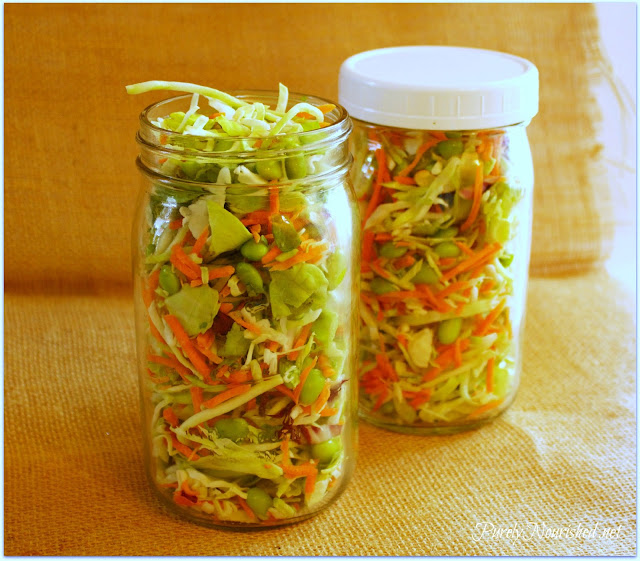
If storing for later meals you can easy put the un-tossed salad either in bags or jars to add dressing later.


This will make approximately 6 quarts of salad as written here. Add more lettuce to the base if you want to stretch it further.

Mock Peanut Dressing


1/2 cup raw Almond Butter
1/4 cup Water
1 Tbsp fresh Lemon juice
2 tsp Agave or Coconut Nectar or Maple Syrup
2 tsp Tamari
1/2 tsp crushed Garlic (1 clove)
1/4 tsp grated fresh Ginger
dash Cayenne Pepper
dash Sea Salt

Place all ingredients in a blender and process until smooth. Store in sealed container in the fridge. Should keep 5 days. Makes 1 cup

Raw Food Made Easy For 1 or 2 PeopleDressing Recipe found in Jennifer Cornbleet's Raw Food Made Easy for 1 or 2 people, which by the way is a really great book!

I haven't ever made something from this book that we did not like.


So there you have it: My Cheater Thai Crunch Salad. I hope you give it a try and come back and let me know how you liked it here in the comments.

I'll be sharing this over at Gluten-Free Cats' Raw Thursday as well as Healthy Vegan Fridays.


NOTE: I have added Recipage to this blog so all recipes can be found indexed and ready for easy printing at the Recipe tab at the top of the page. Enjoy!


Find us on Facebook here, Follow on Pinterest here, and See what we're up to on Instagram here.


Sunday, June 23, 2013

Angel Salad


You probably get by now that I think all the things I make are tasty, at least the things I post or I wouldn't be sharing them but this one…  this one is really really lovely and special!

It's super light, and very simple but the combination of flavors are just delicious. Apricots, fennel, arugula, shallots, and pistachios with a drizzle of white balsamic vinegar. That's it.

It tastes very fancy, like something you would be served in only the finest of restaurants but it's got to be one of the simplest salads with few ingredients and not even a dressing to worry about.

The key is the apricots. I don't know if you have seen these before…


Angelcots or white apricots. They are delicious!!

I had never had them or even seen them but I stumbled across these at my local Trader Joe's. While I had planned to take more photos of them, once I sliced them open I found it hard not to just keep eating them. Luckily for this recipe, I was able to hold off enough to finish making the salad but barely!!!

They are a white flesh apricot that is super juicy like a nectarine, and sweet and buttery in texture. The outside is velvety like a regular apricot but the inside is melt in your mouth delicate.

They are a cross between a Morrocan and Iranian apricot and luckily for us, are grown here in the states in California, apparently on only 2 acres of land. Judging by the taste, I say we are going to need more land! They are rare and have a very short growing season but if you ever spy these, I highly recommend you snap them up. June seems to be the cut off. So hurry!

For this recipe, if you can no longer get these jewels, the regular apricots will work as well.

The Angel Salad

Adapted from a recipe by Jeanne Kelley for Bon Appetit. It says it serves 6-8 people - Ha!


Ingredients:


8 ounces of arugula leaves
1 Small fennel bulb, very thinly sliced (mandolin works great for this) 
2 Tablespoons of minced fennel fronds
6 Apricots, pitted and sliced thin
1 Shallot, sliced into thin rings and separated (while you have that mandolin out….)
1/4 cup shelled unsalted pistachios
2 Tablespoons white balsamic vinegar


Place the arugula and fennel in a big bowl.


Add in the shallots rings.

Drizzle with the balsamic vinegar and toss. Add in the apricots (sorry, no picture because I was distracted! ;-) or save and plate the greens and place the apricot slices decoratively on each plate.  


Top with the pistachios and any additional minced fronds for garnish and serve.


Just heavenly!

I hope you get a chance to try this with the Angelcots. It's definitely worth the extra effort looking for them. Hopefully if more people know about them, more stores will carry them and even more will grow them! One can hope.

I think I may just post this a bit early to get the word out and hopefully give some people time to get these apricots before the season is over.

I'll be sharing this over at Gluten-Free Cats' Raw Thursday as well as Healthy Vegan Fridays.

Just a note about my Instagram photos:  


Sometimes I post simple recipes over there, for instance smoothies or throw together meals in picture form along with snap shots of what I'm making or doing so if that sounds interesting to you, check me out there and follow along.
Here's the link.


Until next time, keep your food real and simple… it's just better that way.


Find us on Facebook here, Follow on Pinterest here, and See what we're up to on Instagram here.

Saturday, June 22, 2013

Zesty Watermelon Gazpacho


Looking for something cool and refreshing to start your meal or actually be a light meal this summer?
Well then, this is it!

Chilled Watermelon Gazpacho

A light chilled soup with a little zestiness to it. Blending super hydrating watermelon and cucumbers, with a little lime, cilantro and a subtle hint of jalapeno and onion and you have this wonderful soup.

It takes only a few mints to whip up, but like most things, benefits from time to marinate and chill.  It's even better the next day, if you can wait that long.

Watermelon Gazpacho

Adapted from a recipe of Tyler Florence found here.

Serves approximately 4 as a small appetizer or 2 as a main soup. Highly recommend doubling!


Ingredients:

2 cups fresh watermelon, cubed and chilled if serving right away.
1/2 cucumber, peeled and seeded
1 large tomato
1/2 jalapeno pepper, seeded
2 tablespoons red onion, diced
1/2 lime, juiced
2 tablespoons fresh cilantro, chopped
salt and pepper to taste, optional

Directions:

Blend tomato, chili pepper and 1/2 the watermelon in a blender into a puree. Add the lime juice and pulse again. Add onion, the cucumber and cilantro until week blended and smooth. Salt and pepper to taste and blend again.

Chill for approximately 15 minutes minimum, if possible.


When ready to serve, pour into glasses or bowls (chilled would be a good idea) then top with remaining cubed watermelon and additional chopped cilantro, onion and even a wedge of lime.


Enjoy!

Sharing for Gluten-Free Cats' Raw Thursday as well as Healthy Vegan Fridays. Have you checked these sites out? There are some great recipes being shared both places weekly!

Until next time!


Find us on Facebook here, Follow on Pinterest here, and See what we're up to on Instagram here.


Sunday, June 16, 2013

German Chocolate Banana Ice Cream


Banana Ice Cream for those that don't already know about this delectable treat, is a simple blending of frozen bananas to create a frozen treat similar to ice cream without the dairy, sugar, salt or in the case of store bought ice cream, chemicals.

It's super easy and even for the most dedicated ice-cream eater (me) it replaces the need to ever buy ice-cream or frozen yogurt again. YAY!

I have to confess, when I am home alone and not preparing food for others, this often will be my meal of choice, covered in fresh berries and maybe a handful of walnuts. It's fully satisfying.

You can customize it to your every taste.


German Chocolate

Yesterday I started making a German Chocolate version. Today being Father's Day, it has become all too clear that it was no coincidence.

German Chocolate Cake was a favorite of my dad's. He passed when I was very young, but not before he got me hooked on this favorite flavor combo, which is rich chocolate, coconut and pecans.

So for today, I dedicate this recipe to my dad, a very special man who changed my life forever.


Ingredients:


4 frozen bananas, sliced in coins before freezing makes it easier to blend
splash of vanilla
1/4 cup almond milk, unsweetened
2 tablespoons Cacao, Cocoa or Carob
2 tablespoons pecans, chopped
2 tablespoons dried unsweetened coconut

For Blender:

Blend bananas with splash of vanilla and add enough almond milk to get it mixing. Often it's better to pulse to get it going. When you get the vortex and it's creamy, add in the coconut and cacao, cocoa or carob and blend until well combined. The coconut will make it no so creamy. Stir in pecans until well combined.

For Food Processor:

Add the frozen bananas and pulse to get it mixing. 
Adding an unfrozen banana will help it mix better too but that's optional.
If not using an unfrozen banana then add milk as needed. You want it to look creamy with no chunks.
Add the cacao, cocoa or carob and coconut and blend again. Stir in nuts.

It should be the consistency of soft serve now and you have a choice:

Eat as is or freeze in a sealable container to harden.

Personally I usually just eat it soft serve style and creamy but here I made enough for 4 (did I say 4?- oops!) so I froze it to scoop out later.


It needs to soften a bit before ready to scoop. Top with additional pecans and coconut bits.


And there you have it, German Chocolate Banana Ice Cream.


I think this is a perfect share for Gluten-Free Cats' Raw Thursday as well as Healthy Vegan Fridays.


Now go get yourself more bananas!

Happy Father's Day!!!


Find us on Facebook here, Follow on Pinterest here, and See what we're up to on Instagram here.

Saturday, May 25, 2013

Fresh Fruit Vanilla Creme Tart with Chocolate Brownie Crust


We are interrupting our regularly scheduled Super Soup Sunday to bring you a festive Memorial Day dessert idea. It's also a departure from my low fat, sugar free and salt free recipes because it's a special occasion and this favorite recipe is really just too luscious not to share. Plus it's better to share so you don't eat it all by yourself. It's a raw dessert (shhhh!) I guarantee your non raw or even non health conscious friends and family will definitely appreciate this fresh fruit tart with a dark chocolatey brownie crust.

It's to live for! 


Plus it's just a beautiful dessert anyway you decorate it.

The Chocolate Brownie Crust

raw, vegan, dairy free, gluten free, soy free


Ingredients:

1 1/4 cup medjool dates, soaked about 20 minutes and pitted- soft not soggy
1 cup almonds
3/4 cup cacao or unsweetened cocoa
1/3 cup cacao nibs
1/2 teaspoon vanilla
pinch of sea salt


Process all the ingredients, except vanilla in a food processor until crumbly, scraping down sides as you go to keep it well mixed. Add the vanilla as it's processing. You want the mixture to stick together and hold when pinched between your fingers. Add a little water if necessary until it does. Be careful not to over process. You don't want chocolate almond butter.


When the crust is ready, lightly coat the bottom of a tart pan with a little coconut oil and press the mixture into the bottom and up the sides.

By now you probably have noticed I love kitchen gadgets, even in my tiny kitchen. Just like in interior design and construction, the right tool makes for a better job and these are no exception.

When it comes to raw desserts, these are a couple of life savers:  A tart/quiche pan with a removable bottom. (just be careful- these edges are razor sharp!) Any shape is good. I even have little ones for individual tarts. Also this little wooden tart tamper for getting the crust pressed just right (believe me this little tool really saves your fingers.)

Set the crust pan into the freezer to firm up while making the creme.

Vanilla Creme Filling

raw, vegan, dairy free, gluten free, soy free


Ingredients:

1 cup cashews, soaked 1-2 hours and drained
2/3 cup coconut oil
1/4 cup agave nectar
2 tablespoons of water
1 tablespoon of vanilla

Blend well until nice and creamy.


Pour into crust and spread around in a nice even layer. Return to freezer until well set.  Maybe an hour or so. When set, lift up the bottom plate carefully from the middle center to free the shell from the mold. There will still be a plate underneath just not around the sides- the beauty of the tart pan makes for easy serving.


Then decorate with fresh berries of your choice. In a pattern or….


… randomly. It looks deliciously inviting either way.

You can decorate right before ready to serve but make sure it has thawed a bit. Or decorate ahead of time. If you do it ahead of time, let it thaw about a half hour or so before serving so berries are not frozen. (Even the thought of biting into frozen berries makes my teeth hurt!) Keep in mind that coconut oil turns to liquid at around 75 degrees so it's better served slightly chilled and not left out in the sun.

Keep leftovers, if any, in the freezer.

I hope you try this one. It's pretty easy, always lovely, and better yet always enjoyed.

Please note: I was experimenting with my night lighting when taking these pictures, and some were even taken quite a few months back. So please forgive them not turning out so great. I'm getting there!


I'm going to be sharing this on both Healthy Vegan Fridays as well as Raw Food Thursdays.

If in the states, I hope you enjoy your Memorial Day Weekend. If you are elsewhere, why not celebrate anyway and make yourself a delicious tart?

Until next time….


Find us on Facebook here, Follow on Pinterest here, and See what we're up to on Instagram here.

Friday, May 17, 2013

Spicy Peanut Zucchini Noodles with Broccoli and Carrots


Slightly spicy peanut and ginger sauce over freshly made zucchini noodles with added broccoli and carrots.  Doesn't that sound good? 

I thought so.


I was perusing through a new book by the producers of the must see film, Forks Over Knives called applicably, Forks Over Knives, the Cook Book, when I ran across this recipe by Julieanna Hever.

First let me say, if you are looking for inspiration with a plant based diet, there are a lot of great looking recipes in this book- 300 to be exact. This one was the first to make me get up out of my chair and actually make a shopping list.

Bonus: This is good hot, cold and even raw. You can't go wrong.

The recipe calls for brown rice noodles but I decided to up the veggie content and go with fresh zucchini instead. I also added some carrot shreds and garnish. You could make this totally raw if you prefer but I did steam the veggies and veggie noodles to lessen the crunch and chewing.

For the raw version, just forget the stove instructions. And of course you can substitute a cooked noodle of your choice for the zucchini.

Spirooli in Action

While you can always use a hand vegetable peeler or even a julienne peeler to make noodles, I decided to use the Spirooli. This is a new toy for me that I instantly loved. It makes long noodles out of lots of different vegetables in minutes. It's easy to clean, dishwasher safe and I like that the three different blade types fit in a little drawer type set up in the machine itself for simple storage. Little suction feet help it to stick to the counter top too so it doesn't move around on you. For someone wanting to move away from gluten, or packaged food this is a great gadget to have around.


Spicy Peanut Zucchini Noodles with Broccoli and Carrots

Adapted from the book Forks Over Knives, the Cookbook

A delicious and refreshing noodle bowl whether served hot or cold. Slightly spicy peanut dressing adds a great flavor to the zucchini, broccoli and carrots. 


Ingredients:

5 medium sized zucchini (also called courgettes, and green summer squash) or 8 ounces of noodles
4 cups broccoli florets, about 2 large heads
2 large carrots, julienned (if organic there is no need to peel)
1/2- 1 cup coconut water, fresh or bottled is fine
3 tablespoons peanut butter, or nut butter of choice. (I used some nothing added peanut butter.)
2 tablespoons pure maple syrup ( B grade), or liquid sweetener of choice
2 tablespoons of Bragg's Liquid Aminos or low sodium soy sauce or tamari
1 tablespoon peeled and minced fresh ginger
1/2 teaspoon crushed red pepper flakes or to taste

Garnish: (optional)

1 chopped green onion, green part only
1 tablespoon chopped cashew pieces
1 tablespoon raw sesame seeds


Start with making your noodles. Figure about 1 zucchini per person but plan for left overs too.

If using grain based noodles, start the water on the stove top and follow package directions. When the noodles are done, add the broccoli and carrots to the water and cook about 1 minute. Drain and set aside.

If steaming your veggies including zucchini noodles, set a large pot and steamer on the stove with enough water to cover the bottom and bring to a boil.  Add individually zucchini noodles, broccoli and carrots until lightly steamed, a couple of minutes. Drain and set aside in a large bowl.

For the sauce:


Blend 1/2 cup of coconut water, nut butter, maple syrup, Bragg's Aminos, ginger and red pepper until well combined, adding more coconut water until desired consistency. Serve cold or heat gently in a small saucepan over medium heat, stirring constantly until warmed through. Note: heating may make the sauce thicker.

Pour sauce over noodles and toss well. Plate and garnish with cashew pieces, green onions and sesame seeds, if desired.


So there you have it; a great fresh noodle dish with loads of flavor. Perfect for summer.

This is my entry for Healthy Vegan Fridays  blog party and also for Raw Food Thursdays

So have you made noodles from veggies? or is there another great gluten free noodle that you've discovered? I'd love to hear what people are trying and liking.

Until next time…keep it real, the food that is.


Keep in touch! Have you liked us over on Facebook yet? Like us here for updates and more healthy recipes and tidbits! Or even better, subscribe by email above so you don't miss a post.

Find us on Facebook here, Follow on Pinterest here, and See what we're up to on Instagram here.